WPC wall panels install faster than tile and cleaner than painted drywall - but only when the basics are done right. This guide walks contractors through how to install wpc wall panels from wall prep to final trim, covering both adhesive fixing on flat walls and furring-strip fixing on uneven surfaces. Total install time for a standard room: roughly half a day for two people.
Tools & Materials Checklist
Spirit level (1.2 m min), tape measure, pencil, chalk line
Circular saw or fine-tooth handsaw with guide; jigsaw for cutouts
Wall panel adhesive (solvent-free, rated for panel weight) or furring strips + screws
Trim: edge profiles, corner profiles, base trim, panel caps
Stud finder, drill, screwdriver, rubber mallet, spacers
Safety: dust mask, gloves, eye protection
Step 1: Prepare the Wall
The #1 cause of failed wpc wall panel installation is an unprepared wall. The surface must be flat, dry and sound: fill holes and cracks, remove wallpaper and loose paint, and sand smooth. Check flatness with a long straightedge - deviations over 3 mm per meter need correction. New plaster must cure fully (check the manufacturer's drying time). For bathrooms and humid rooms, ensure the substrate is drywall or cement board, never bare masonry with active damp.
Step 2: Plan the Layout
Measure the wall and plan panel positions before cutting anything. Mark the starting point: for a balanced look, center the layout so cut panels at each end are equal width. Snap a vertical chalk line at the first panel position and check it with a level. Remember the expansion gap: WPC expands and contracts with temperature, so leave 3–5 mm at top and bottom, and a 2–3 mm gap between panels if the manufacturer specifies it. Plan cutouts for sockets and switches - mark them from the back of the panel for accuracy.
Step 3: Cut the Panels
Cut face-side up with a circular saw and a fine-tooth blade to minimize edge splintering, or score-and-snap for thin panels. For cutouts, use a jigsaw with a down-cut blade. Always cut the grooved side cleanly - hidden-fastener clips and tongue-and-groove joints depend on crisp edges. Test-fit each panel before applying adhesive.
Step 4: Fixing Method A - Adhesive on Flat Walls
On flat, sound walls, construction adhesive is fastest. Apply the wall panel adhesive in a serpentine or grid pattern (not edge-only), then press the panel into place against the chalk line, tapping with a rubber mallet through a scrap board to avoid marking the face. Check level in both directions. Hold the panel with temporary bracing or adhesive wedges for the first 10–15 minutes while the adhesive sets. For walls over 2.4 m high, add mechanical fixings (screws into studs, hidden under trim) as secondary support.
Step 5: Fixing Method B - Furring Strips on Uneven Walls
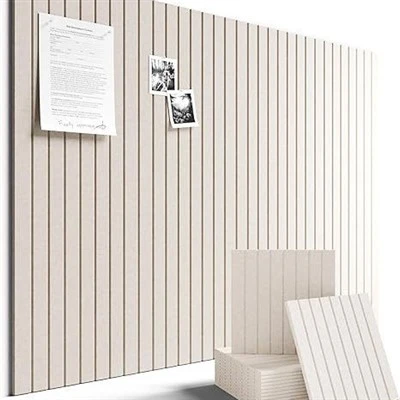
For old or uneven walls, install 20–40 mm furring strips (or aluminum profiles) at 400–600 mm centers, shimmed to a true plane and fixed to the structure. This creates a ventilated cavity that also helps moisture management in humid rooms. Fix the panels to the strips with screws or clips - use the hidden-fastener system if your WPC panels are grooved. This method is also the standard for fluted slat walls, where a floating installation avoids visible fixing points.
Step 6: Corners, Edges & Trim
Install the supplied corner profiles and edge trims before the last panel in each row. Use flexible joint trims at internal corners to allow movement, and rigid profiles at external corners. Top and bottom: fit base and ceiling trim to cover the expansion gaps - never caulk the gap solid, or the panel cannot move. For wood grain wall panels, match grain direction across panels and use the same production batch in one room to avoid tone differences.
Common Mistakes to Avoid
|
Mistake |
Consequence |
Fix |
|
Skipping expansion gaps |
Panels buckle in heat |
Always leave 3–5 mm top/bottom |
|
Adhesive on dusty wall |
Panels delaminate later |
Prime and clean the wall first |
|
No mechanical fix above 2.4 m |
Panels sag over time |
Screw into studs at top edge |
|
Tight panel-to-panel joints |
Waviness at joints |
Follow manufacturer gap spec |
|
Caulking gaps solid |
Restricts movement, cracks |
Use trim, not caulk |
Finishing: Lights, Switches & Maintenance
Cutouts for sockets and light switches should be made before fitting the panel - mark from the back, drill a pilot hole and finish with a jigsaw. Use the manufacturer's edge trim around cutouts for a clean line. After installation, wipe panels with a damp cloth; avoid abrasive cleaners that dull the embossed grain. This is also the moment to record which production batch was installed in each room - the practical version of batch traceability for the contractor's own warranty records. Follow these steps, and the answer to how to install wpc wall panels becomes a repeatable system your crew can run in half a day per room, project after project.
Done right, a WPC wall is a permanent finish: no painting, no re-covering, and panels that wipe clean for 15–20 years. The material does the work - the installation just has to stay out of its way.
About Naturwing: Naturwing (Hangzhou Feihuang Industry Co., Ltd.) manufactures WPC wall panels with 27+ years of experience, CE/SGS/ISO 9001 certification and complete installation documentation with every order. Request the installation guide and free samples.